In this class, we will write programs.
But first, what is a program?
A program is a sequence of instructions that specifies how to
perform a computation.
Every program you've
ever used, no matter how complicated, is made up of small instructions that
look much like the following:
-
input: get data from the keyboard, a file, a sensor, or some other device
-
output: display data on the screen, or send data to a file or other device.
-
math: perform basic mathematical operations like addition and division.
-
decisions: check for certain conditions and execute the appropriate code
-
repetition: perform some action repeatedly, usually with some variation.
We can think of programming as the process of:
breaking down a large, complex task into smaller and smaller subtasks.
The process continues until the subtasks are simple enough to be performed with
the basic instructions provided by the computer.
What is Computer Science?
One of the most interesting aspects of writing programs is deciding how to
solve a particular problem, especially when there are multiple solutions.
In order to determine which way is best for a given situation,
we need techniques for describing and analyzing solutions formally.
Computer science is the science of algorithms, including their discovery and
analysis.
An algorithm is a sequence of steps that specifies how to solve a
problem.
- Some algorithms are faster than others, and some use less space
in computer memory.
Designing algorithms and writing code is difficult and error-prone.
For historical reasons, programming errors are called bugs, and the process of tracking them down and
correcting them is called debugging.
The programming language you will learn in this class is Java, which is a high-level language.
A high-level language is any programming language that enables development of a program
in a much more user-friendly programming context and is generally independent of the computer's hardware
architecture.
Other high-level languages you may have heard of include:
- Python
- C and C++
- Ruby
- JavaScript
Before they can run, programs in high-level languages have to be translated
into a low-level language, also called “machine language”.
This translation takes some time, which is a small disadvantage of high-level languages.
High-level languages have two advantages:
- It is much easier to program in a high-level language.
- Programs take
less time to write, they are shorter and easier to read, and they are more
likely to be correct.
- High-level languages are portable, meaning they can run on different
kinds of computers with few or no modifications.
- Low-level programs
can only run on one kind of computer, and have to be rewritten to run
on another.
Two kinds of programs translate high-level languages into low-level languages:
interpreters and compilers
- An interpreter reads a high-level program and
executes it, meaning that it does what the program says.
It processes the program a little at a time, alternately reading lines and performing computations
- A compiler reads the entire program and translates it completely
before the program starts running. In this context, the high-level program is called the source
code, and the translated program is called the object
code or the executable. Once a program is compiled, you can execute it
repeatedly without further translation. As a result, compiled programs often
run faster than interpreted programs.
As aforementioned, Java is a high-level, class-based, object-oriented programming
language and software platform that runs on billions of devices,
including notebook computers, mobile devices, gaming consoles,
medical devices and many others. The rules and syntax of Java are
based on the C and C++ languages.
Here are some specific examples of real world applications that use Java:
- LinkedIn
- Minecraft
- Amazon Web Services (AWS)
To create an application using Java, you will need:
-
to download and install the Java Development Kit (JDK),
which is available for Windows, macOS, and
Linux.
-
A command-line interface (CLI) on your computer that allows you to
create and delete files, run programs, and navigate through
folders and files (On a Mac, it's called Terminal, and on Windows, it's Command
Prompt) OR an integrated development environment (IDE) - a software
application that helps programmers develop software code
efficiently by combining capabilities such as software editing,
building, testing, and packaging in an easy-to-use application,
such as
Eclipse,
NetBeans,
IntelliJ, DrJava, etc.
You write the program in the Java programming language, then a
compiler turns the program into Java bytecode—the instruction set
for the Java Virtual Machine (JVM) that is a part of the Java
runtime environment (JRE). Java bytecode runs without modification
on any system that supports JVMs, allowing your Java code to be run
anywhere. The Java software platform consists of the JVM, the Java
API, and a complete development environment. The JVM parses and runs
(interprets) the Java bytecode.
The Java API consists of an
extensive set of libraries including basic objects, networking and
security functions; Extensible Markup Language (XML) generation; and
web services. Taken together, the Java language and the Java
software platform create a powerful, proven technology for
enterprise software development.
To start programming in Java, we can write a simple program that
outputs "Hello, World!" on the screen. Since it's a very simple
program, it's often used to introduce a new programming language to
a newbie! 😃
Let's explore how Java "Hello, World!" program works:
// Our First Program
public class HelloWorld {
public static void main(String [] args) {
System.out.println("Hello, World!");
}
}
How does the "Hello, World!" program work?
-
In Java, any line starting with // is a single-line comment
(We will learn more about multi-line comments in a bit). Comments
are intended for users reading the code to understand the intent
and functionality of the program. It is completely ignored by the
Java compiler (an application that translates Java program to Java
bytecode that computer can execute).
-
Every application begins with a class definition. In this
particular program, HelloWorld is the name of the class and the
name of the class should match the filename in Java.
-
Next is the main method. Every application in Java must contain
the main method. The Java compiler starts executing the code from
the main method, and it's mandatory in each of our executable Java
programs. The signature of the main method in Java is:
public static void main(String [] args) { ... }
-
Lastly, we have a print statement. It prints the text Hello,
World! to standard output (your screen). The text inside the
quotation marks is called a String literal in Java.
Notice the print statement is inside the main function, which
is inside the class definition.
You may have seen variables before (Think back to high school algebra!
Solving for X, etc.)
In programming, a variable is a location in memory (storage area) that
holds data.
(For now just one value at a time ... we'll come back to this later)
To indicate the storage area, each variable is given a unique name.
The names of variables, called identifiers, conform to the
following rules:
-
Identifiers CANNOT be a keyword (ex. keywords like int, for, class,
etc CANNOT be used as a variable name (or identifier) as they are
part of the Java programming language syntax
-
Identifiers are case-sensitive (ex. age, AGE, Age, etc. are all
valid identifiers and can all exist within the same program,
although NOT RECOMMENDED 😡)
-
Identifiers can be made up of a sequence of letters and digits.
However,
it must begin with a letter, '$' (dollar sign) or '_'
(underscore).
(It is convention to start an identifier with a letter) The first
letter of an identifier CANNOT be a digit.
-
Identifiers CANNOT contain whitespaces, nor symbols such as @, #,
and so on.
- Examples of VALID ✔️ identifiers:
- player1
- score
- level
- highScore
- Examples of INVALID ❌ identifiers:
- pl@yer
- 1score
- class
- highest Score
It is easy to declare a variable!
First we identify the necessary keyword for the variable datatype.
For example, a whole number should be declared as an integer type
known as int while a decimal number should be declared as a float or
double.
int score = 42;
This syntax can be used to declare both local and global variables
(we'll talk about this more later 😉).
In the previous example, we have assigned value to the variable
during declaration -- this is known as initialization, because we
assign an initial value to a variable.
However, we can also declare variables and assign variables
separately.
For example:
int score;
score = 42;
When you declare a variable, you create a named storage location.
When you make an assignment to a variable, you update its value.
The value of a variable can be modified throughout the program
(that's what makes it a variable, opposed to a
literal)
For example:
int score = 0;
//more code to be added here
score = 42;
Here, initially, we set the score to 0.
Later (after some more code -- not yet specified) we changed it to
42.
It is important to remember, however, that we CANNOT change the data
type of a variable in Java within the same scope (we'll discuss
scope a bit more later, for now just think of our scope limited to
the main method)
We can display the value of a variable using print or println.
int score = 42;
//What should be printed below?
System.out.println(score);
When we talk about displaying a variable, we generally mean the value of the variable.
To display the name of a variable, you have to put it in quotes.
The scope of a variable is the part of the program where the variable is accessible.
In general, a set of curly brackets { } defines a scope.
A variable declared inside pair of brackets “{” and “}” in a method is only accessible within the scope of
the brackets only.
(This will make more sense when we explore conditional statements, loops, methods, etc.)
We can also declare variables directly inside the class (outside any specific method -- we will revisit this
once we begin writing more methods).
These variables can be directly accessed anywhere in class.
Operators are symbols that perform operations on variables and
values. For example, we know that + is an operator used for
addition, while * is an operator used for multiplication.
Operators in Java can be classified into the following types:
- Arithmetic Operators
-
Arithmetic operators are used to perform arithmetic operations
on variables and data.
- The various arithmetic operators we use include:
- + (Addition, e.g. a + b)
- - (Subtraction, e.g. a - b)
- * (Multiplication, e.g. a * b)
- / (Division, e.g. a / b)
- % (Modulus -Remainder after division, e.g. a % b)
- ++ (Increment, e.g. a++ or ++a)
- -- (Decrement, e.g. a-- or --a)
- Assignment Operators
-
Assignment operators are used in Java to assign values to
variables.
- A few assignment operators available in Java include:
- = (Assignment, e.g. a = b)
-
+= (Additional assignment, e.g. a += b is equivalent to a = a
+ b)
-
we can also write assignment operators for other arithmetic
operations such as subtraction, multiplication, division,
modulus, etc.
- Relational (or Comparison) operators
-
Relational/Comparison operators are used to compare two values
(or variables). The values returned from comparison are known as
boolean values and will either be true or false.
-
A few relational/comparison operators available in Java include:
- == (Equal to, e.g. a == b)
- != (Not equal to, e.g. a != b)
- > (Greater than, e.g. a > b)
-
< (Less than, e.g. a < b)
- >= (Greater than or equal to, e.g. a >= b)
-
<= (Less than or equal to, e.g. a <=b)
- Logical Operators
-
Logical operators are used to determine the logic (whether a
statement is true or false)
between
variables or values.
- A few logical operators available in Java include:
-
&& (Logical and - returns true if both statements are true,
e.g. a < 5 && b < 5)
-
|| (Logical or - returns true if one of the statements is
true, e.g. a < 5 || b < 5)
-
! (Logical not - reverses the result, returns false if the
result is true, e.g. !(a < 5 && b < 5)))
- Unary Operators
- Post-increment/decrement (also known as postfix)
-
Here our code performs the specified operation first,
and then increments/decrements the value.
// Postfix increment example
public class PostfixExample {
public static void main(String [] args) {
int a = 5;
System.out.println(a++);//prints the current value of a (5) BEFORE incrementing
System.out.println(a);//value has been printed out, incremented, now prints 6
}
}
Bitwise Operators
TO REMEMBER:
Floating-point numbers in Java are used to represent fractional values or numbers with a large range of
possible values.
They are primarily used when precise decimal calculations are not required.
Java uses two primitive data types to represent floating-point numbers: float and double.
- The float data type is a 32-bit single-precision floating-point number
- The double data type (which we will use in this class rather than float) is a 64-bit
double-precision floating-point number.
This makes the double data type more accurate than the float data type.
We can create double variables and assign values to them using
the same syntax we used for the other types:
double payRate = 42.5;
The simplest way to convert a floating-point value to an integer
is to use a type cast, so called because it molds or “casts”
a value from one type to another.
The syntax for type casting is to put the name of the type
in parentheses and use it as an operator.
double payRate = 42.5;
int pay = (int) payRate;
What is the value of the variable pay?
Integer vs Floating Point Division
In math, division often allows for remainders.
It is why whenever a number is NOT evenly divisible by another number
it can result in a decimal number opposed to a whole number
e.g. 5/2 is equal to 2.5
However, integer division and division as we know from math class
(also known as floating-point division) are two different ways of performing division
operations.
Integer division is the division operation performed on two integers, resulting in an integer
quotient.
The result is obtained by discarding the fractional part of the division, if any.
In other words, it performs a "round towards zero" operation.
- For example, if you perform an integer division of 10 divided by 3, the result is 3 because it discards
the fractional part.
- Similarly, if you divide -10 by 3 using integer division, the result is -3, as it still rounds towards
zero.
On the other hand, floating-point division is the division operation performed on floating-point numbers
(those with decimal places).
It produces a result with decimal places, including the fractional part.
This type of division is typically more accurate and provides more precise results.
In Java, when dividing two integers using the '/' operator,
integer division is performed if both operands are integers.
To perform floating-point division, at least one of the operands should be a floating-point number.
For example:
int result = 10 / 3;//Integer division, result is 3
double result = 10.0 / 3;//Regular division, result is approximately 3.3333
It is important to be aware of the distinction between integer division and floating-point division,
especially when working with different data types and when precision is required in calculations.
Java has a lot of built-in Math methods that allow us to perform more complex mathematical computations.
The Math class is found in the java.lang package, so you don't have to import it.
For example, if you need to get the square root of a number, we use the Math.sqrt() method.
Some frequently used Math class methods include:
- Math.abs(n) - for computing the absolute value of a particular number
- Math.sqrt(n) - for computing the square root of a particular number
- Math.pow(base, exp) - for computing the result of a particular base raised to the power of a
particular exponent
Although not a method, Math.PI - is a static final double constant in Java, equivalent to in π Mathematics
You can learn more about the Java Math class methods from the Java API here
Generating Random Numbers
Most computer programs do the same thing every time they run,
meaning they are deterministic. Usually we want our
programs to be deterministic since we expect the same
calculation to yield the same result. But for certain applications (e.g. games)
we want to write programs that are nondeterministic.
It is hard for a computer to generate truly random numbers. But there are algorithms
that generate unpredictable sequences called pseudorandom numbers. For
most applications, they are as good as random.
The Math.random() method returns a pseudorandom
double type number between 0.0 and 1.0,
where 0.0 is inclusive and 1.0 is exclusive.
When this method is first called,
it creates a single new pseudorandom-number generator
public class RandomExample {
public static void main(String [] args) {
double rand = Math.random();//Generate random number
System.out.println("Random Number:" + rand);//different each run
}
}
to generate a random number in range:
Math.random() * (max - min) + min;
There are three types of errors can occur in a program:
- Compiler errors
- Run-time errors
- Logic errors
Compiler errors occur when you violate the syntax rules of the Java language.
For example, forgetting a semicolon at the end of a statement or
that parentheses and braces have to come in matching pairs.
So (1 + 2) is legal, but 8) is not.
In the latter case, the program cannot be compiled, and the compiler displays an error.
- Error messages from the compiler usually indicate where in the program the error occurred, and sometimes
they can tell you exactly what the error is.
Run-time errors occur while the interpreter is executing byte code
and something goes wrong.
These errors are also called “exceptions” because they usually
indicate that something exceptional (and bad) has happened.
(Example: attempting divide by zero)
- When a run-time error occurs, the interpreter displays an
error message that explains what happened and where.
The third type of error is the logic error.
If your program has a logic error, it will compile and run
without generating error messages, but it will not do the right thing.
Instead, it will do exactly what you told it to do (even if it isn't the right solution).
- Usually the compiler and the interpreter CANNOT help you,
since they don't know what the right thing is.
So far we have used System.out.println() to display text to the
screen. But what does it actually mean?
System is a class (that belongs to the java.lang package,
which is imported automatically) that provides methods related to the “system” or
environment where programs run.
System.out represents the Standard Output Stream. That means that if we want to print any
statement on the console, we
should use the following statement:
System.out.print();
There are three methods we use to print statements:
- print(String s)
- Used to print on the console.
- Accepts a String as a parameter (we can concatenate parts to
the String if necessary, i.e. “Hello” + “ World”, etc.
however, it is typical convention to include all string literals
in the same pair of quotations if they are consecutive)
- After printing the statement, the cursor remains on the same line.
- println(String s)
- An upgraded version of the print() method,
also used to display text on the console.
- After printing the statement,
it throws the cursor at the start of the next line.
- printf(String format, datatype args)
- Accepts two parameters:
- format: It is a formatted String, uses placeholders
with specific conversion characters to refer to the
arguments that will be replaced when printing
-
args: It is an argument referenced by the format specifiers.
If the number of arguments is more than the format specifiers, the other arguments are ignored.
The number of arguments may be zero.
A formatted placeholder is declared as follows:
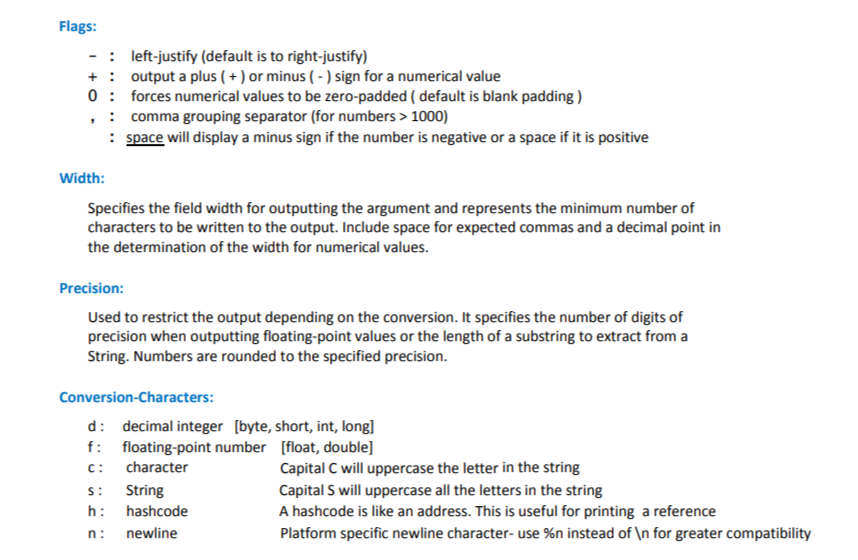
%[flags][width][.precision]conversion-character
With any flags, width, and precision as optional modifiers
Feel free to consult the following:
printf() throws:
- a NullPointerException if the format is null
- an IllegalFormatException if a format string contains illegal syntax
- an IllegalFormatConversionException if the placeholder and corresponding argument are not of the
same type
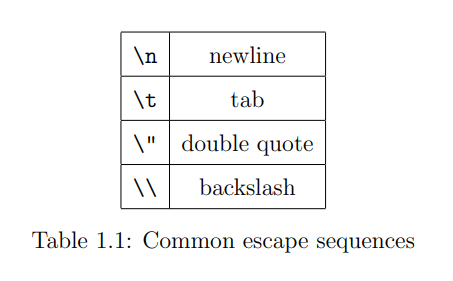
The \n is an escape sequence, which is a sequence of characters that represents a special
character. The backslash allows you to “escape” the string's
literal interpretation.
As we previously discussed, a variable in Java must be declared as a specific
data type. These data types are divided into two groups:
- Primitive Data Types, which specify the size and type of variable values and has no
additional methods
AND
- Non-primitive data types, also called reference types because they refer to objects
Primitive Data Types
Data Type |
Size |
Description |
byte |
1 byte |
Stores whole numbers from -128 to 127 |
short |
2 bytes |
Stores whole numbers from -32,768 to 32,767 |
int |
4 bytes |
Stores whole numbers from -2,147,483,648 to 2,147,483,647 |
long |
8 bytes |
Stores whole numbers from -9,223,372,036,854,775,808 to 9,223,372,036,854,775,807 |
char |
2 bytes |
Stores a single character/letter or ASCII values |
float |
4 bytes |
Stores fractional numbers. Sufficient for storing 6 to 7 decimal digits |
double |
8 bytes |
Stores fractional numbers. Sufficient for storing 15 decimal digits |
boolean |
1 bit |
Stores true or false
values |
The main difference between primitive and non-primitive data types are:
- Primitive types are predefined (already defined) in Java.
Non-primitive types are created by the programmer and is not
defined by Java (except for String)
- Non-primitive types can be used to call methods to
perform certain operations, while primitive types cannot.
- A primitive type has always a value,
while non-primitive types can be null.
- A primitive type starts with a lowercase letter,
while non-primitive types starts with an uppercase letter. (e.g. Strings, etc.)
We will revisit the concept of Strings in depth a bit later but for now just know that
Strings contain a sequence of "characters" strung together.
Characters can be letters, numbers, punctuation marks,
symbols, spaces, tabs, etc.
We can initialize a String simply by stating:
String s = "Hello";
In most cases, we can use a String as a variable data type just like we have for int, double, etc.
(Although all Strings we create are technically objects and have more behaviors than the primitive data
types --
but we'll talk more about that later)
In general, you cannot perform mathematical operations on strings, even if
the strings look like numbers. The following expressions are illegal:
- "Hello" - 1
- "World" / 123
- "Hello" * "World"
However, the + operator DOES work with strings.
For
strings, the + operator performs concatenation, which means joining end-to-end.
So "Hello, " + "World!" yields the string "Hello, World!".
Or if you have a variable called name that has type String, the expression
"Hello, " + name appends the value of name to the hello string, which creates
a personalized greeting
Since addition is defined for both numbers and strings,
Java performs automatic conversions you may not expect:
What do we expect the following code to print?
String s = "Hello";
System.out.println(1 + 2 + s);
How about this one?
System.out.println(s + 1 + 2);
Java executes these operations from left to right.
- In the first example, 1 + 2 is
3, and 3 + the value of variable s ("Hello") is "3Hello"
- In the second example, "Hello" + 1 is
"Hello1", and "Hello1" + 2 is "Hello12"
Reading Input: The Scanner Class
The System class also provides the special value System.in, which
is an InputStream that provides methods for reading input from the
keyboard. These methods are not easy to use; fortunately, Java provides
other classes that make it easier to handle common input tasks.
All reading done in Java uses the Scanner class. Using this class,
we can create an object to read input from the standard input channel
System.in (in our case, the keyboard)
To use the Scanner class, it is necessary to import the class Scanner from
the library java.util by including the following line at the top (before the class declaration) of
program:
import java.util.Scanner;
We can declare a Scanner object by saying:
Scanner sc = new Scanner (System.in);
-
sc is the name of the Scanner object (this can be changed and is
entirely up to the person who writes the code)
-
and System.in connects our object to standard input (the keyboard)
The Scanner class has multiple built-in methods that we can access to help
us read data, for example: we can use sc.nextLine() to read in a line of
String(s) (spaces included)
Other methods include:
- nextBoolean(): reads a boolean value from the user
- nextByte(): reads a byte value from the user
- nextDouble(): reads a double value from the user
- nextFloat(): reads a float value from the user
- nextInt(): reads a int value from the user
-
next(): reads a complete token (String) from the user. A complete token
is preceded and followed by input that matches the delimiter pattern, in
most instances this is a space
When we are done reading in data, it is customary to CLOSE the Scanner to avoid
a possible memory leak. This is simple, we would just state thr following:
sc.close();
Once we no longer need the Scanner (this is typically found at the last could lines of the method)
Now that we have had some experience with Scanner, we need to talk about some unexpected
behavior that may occur
When you read a String followed by an int, everything works just fine.But
when you read an int followed by a String, something strange happens.
System.out.print("What is your age? ");
age = in.nextInt();
System.out.print("What is your name? ");
name = in.nextLine();
System.out.printf("Hello %s, age %d\n", name, age);
Try running this example code. It doesn't let you input your name, and it
immediately displays the output:
What is your name? Hello , age 45
When you call nextInt(), it reads characters until it gets to a non-digit.
At this point, nextInt() returns 45. The program then displays the prompt
"What is your name? " and calls nextLine(), which reads characters until it
gets to a newline. But since the next character is already a newline, nextLine
returns the empty string "".
To solve this problem, you need an extra nextLine() after nextInt()
System.out.print("What is your age? ");
age = in.nextInt();
in.nextLine();// read the newline
System.out.print("What is your name? ");
name = in.nextLine();
System.out.printf("Hello %s, age %d\n", name, age);
This technique is common when reading int or double values that appear on
their own line.
First you read the number, and then you read the rest of the
line, which is just a newline character.
Example: Inches to Centimeters
Now let's see an example, We will use a Scanner to input a measurement
in inches, convert to centimeters, and then display the results.
First let's declare the variables and create the Scanner object that we will call input
int inches;
double cm;
Scanner input = new Scanner(System.in);
Next, let's prompt the user for the input (prompts are important because they let the user know HOW
they should interact with the program)
We'll use print() instead of println() so they can enter the input on the same line as the prompt
and use the Scanner method nextInt(), which reads input from the keyboard
and converts it to an integer
System.out.print("Enter # of inches: ");
inches = input.nextInt();
Now we can multiply the number of inches entered by 2.54 (the number of centimeters there are per
inch)
and display the results
cm = inches * 2.54;
System.out.print(inches + " inches = ");
System.out.printf("%.2f cm%n", cm);
This code works but it does have a minor flaw. If another programmer
reads this code, they might wonder where 2.54 comes from.
How can we modify this for clarity?
A value that appears in a program, like 2.54 (or " inches = "), is called a literal.
In general, there is nothing wrong with literals.
But when numbers like 2.54 appear in an expression with no explanation, they make code hard to read.
And if the same value appears many times, and might have to change in the
future, it makes code hard to maintain.
For the benefit of others (and yourself in the future), it would be better to assign this value to
a variable with a meaningful name:
double cmPerInch = 2.54;
cm = inches * cmPerInch;
This version is easier to read and less error-prone, but it still has a problem.
Variables can vary, but the number of centimeters in an inch does not.
Once we assign a value to cmPerInch, it should never change.
Luckily, Java provides a language feature that enforces that rule, the keyword final.
final double CM_PER_INCH = 2.54;
Declaring a variable as final means that it cannot be reassigned once
it has been initialized. If you try, the compiler reports an error.
Variables declared as final are called constants.
- By convention, names for constants are all uppercase, with the underscore character (_) between
words.
At this point, we have now seen enough Java to write useful programs that solve
everyday problems.
We can:
- import Java library classes
- create a Scanner
- get input from the keyboard
- complete any necessary calculations
- print and format output to the screen
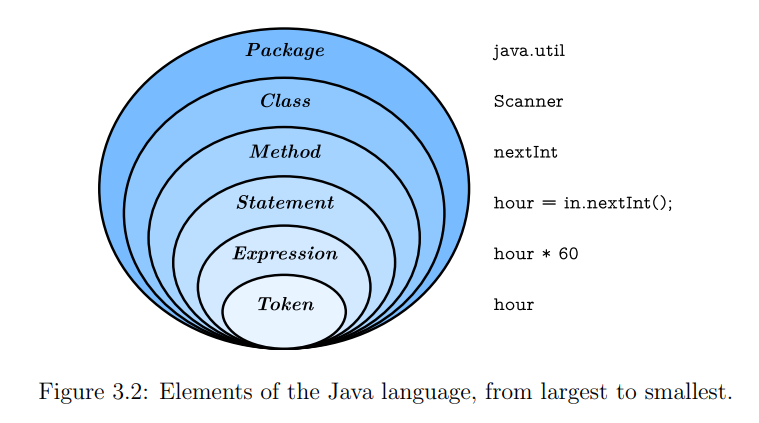
At this point, we have seen all of the elements that make up Java programs.
Figure 3.2 shows these organizational units.
Element |
Definition |
Package |
A collection of classes, which define methods. |
Class |
In object-oriented programming, a class is a basic building block.
It can be defined as template that describes the data and behaviour
associated with the class instantiation. |
Method |
A method in Java is a block of code that, when called,
performs specific actions mentioned in it. When you execute a class with the
Java interpreter, the runtime system starts by calling the class's main() method.
If there are other methods involved, the main() method then calls all
the other methods required to run your application.
The main() method is the key to making a Java program executable.
|
Statement |
A statement is roughly equivalent to sentences in natural languages.
A statement forms a complete unit of execution and almost always ends in a semicolon (;) |
Expression |
An expression is a construct made up of variables, operators, and method invocations,
which are constructed according to the syntax of the language, that evaluates to a single value
|
Token |
Tokens are the basic building blocks of a program.
They are the smallest individual units of a program
that have meaning to the compiler and are used to represent the various elements
of a program, such as keywords, identifiers, operators, and literals |
Using Files: Reading from a File
As previously mentioned, we use a Scanner to read data whether or not the data is from the keyboard or a file.
To read from a file we only need to make one or two modifications from what we learned from reading from
the keyboard.
First, since we are using files we need to allow our program(s) to use them by including:
import java.io.File;//import the File class
Since we are dealing with files, we HAVE to add a throws Exception declaration to main:
public static void main (String [] args) throws Exception {
and create the File object that we will be reading from:
File file = new File("[filename].txt");
And create a Scanner like we have previously done, only changing our reference from the keyboard to the
corresponding file object:
Scanner sc = new Scanner(file);
-
It is important that you remember to create the .txt file that you are trying to
reading from and make sure that it is in the correct directory or to specify the path
where the file is located when creating the File object else you will receive a FileNotFoundException
when you attempt to run your code.
Using Files: Writing to a File
We already know about writing data to the screen by using System.out,
but how about writing data to an outside source such as a file?
Writing to a file is slightly less work since we do not have
to manually create the .txt file ourselves prior to running the program,
the program will do the creation for us. There are many different ways to
write to file in Java but in this class we will keep it relatively
simple and use the PrintWriter class.
Like before, we need to import the PrintWriter class in order to use it:
import java.io.PrintWriter;
Whether we are writing or reading, we are still dealing with files so we still HAVE to add a throws
Exception declaration to main:
public static void main (String [] args) throws Exception {
and create the File object that we will be reading from:
We will use the PrintWriter class to create our file:
PrintWriter pw = new PrintWriter("[filename].txt");
-
It is important to make sure that the filename that you are trying to create
does not already exist in the directory that you are trying to create it in
otherwise, you will overwrite the file and lose your original file data
Now we can use the PrintWriter object to write, the same way that we wrote
to the screen only replacing System.out with our PrintWriter object,
i.e. pw.print(), pw.println(), pw.printf(), etc.
Just like with the Scanner, we need to CLOSE the PrintWriter object:
pw.close();
The intepreter only knows that the program is finished writing
to the file after we close the PrintWriter, so if we forget to close
the PrintWriter the file may appear empty.
Importantly, .close() automatically flushes the stream before closing it,
meaning any data remaining in the buffer will be written to the output.
So far we have seen programs that do pretty much the same thing
every time, regardless of the input. For more complex computations,
programs usually react to the inputs, check for certain conditions,
and generate appropriate results.
We mentioned relational operators briefly before but let's discuss how
they work, more in depth:
Relational operators are used to check conditions like whether two values
are equal, or whether one is greater than the other.
x == y |
// x is equal to y |
x != y |
// x is not equal to y |
x > y |
// x is greater than y |
x < y
|
// x is less than y |
x >= y |
// x is greater than or equal to y |
x <= y
|
// x is less than or equal to y |
You have probably seen these operations before, but it is important to note that the Java
operators are different from the mathematical symbols like =, ≠, and ≤.
A common error is to use a single = instead of a double ==
Remember that:
- = is the assignment operator
- and == is a comparison operator
The two sides of a relational operator must be compatible
For example, the expression: 5 < "6" is invalid because 5 is an int and "6" is a String
However, when evaluating the expression 5 (an int) < 6.0 (a double),
Java automatically converts the 5 to 5.0 because when comparing values of different
numeric types, Java applies the same conversion rules we saw previously with the assignment operator.
The result of a relational operator is one of two special values, either true or false.
These values belong to the data type boolean. In fact, they are the only
boolean values.
Java has three logical operators:
Which respectively stand for:
The results of these operators are similar to their meanings
in English.
For example:
- (x > 0 && x < 10) is true when x is both greater than zero and
less than 10
- The expression (evenFlag || n % 3 == 0) is true if either condition
is true, that is, if evenFlag is true or the number n is divisible by 3
- And the ! operator inverts a boolean expression, so !evenFlag is true
if evenFlag is not true (false)
Logical operators evaluate the second expression only when necessary. For
example:
- (true || anything) is always true,
so Java does not need to evaluate the expression anything
- and (false && anything) is always false
Ignoring the second operand, when possible, is called short circuit evaluation, by analogy with an
electrical circuit.
Short circuit evaluation can save time, especially if anything takes a long time to evaluate.
It can also avoid unnecessary errors, if anything might fail.
If I told you I would show you a picture of a blue square and then you saw the picture and it
wasn't true, which part of my claim “a blue square” wasn't true?
Maybe it was a square and it was a color other than blue? Or maybe it wasn't even a square at all? Maybe it
was neither blue NOR a square entirely?
You could write this as a logic statement like below using negation (!) and the AND (&&) operator since
both parts have to be true for the whole statement to be true.
!(a && b)
//a = "blue"
//b = "square"
If you ever have to negate an expression that contains logical operators, and you probably
will, De Morgan's laws can help.
De Morgan's Laws were developed by Augustus De Morgan in the 1800s.
They show how to simplify the negation of a complex boolean expression,
which is when there are multiple expressions joined by an AND (&&) or OR (||), such as
(x < 3) && (y>
2).
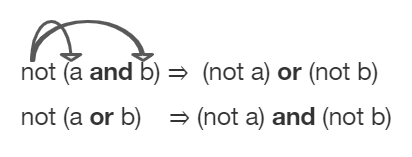
Negating a logical expression is the same as negating each term and changing the operator.
The ! operator takes precedence over && and ||, so you don't have to put parentheses around the individual
terms !A and !B.
Here's an easy way to remember De Morgan's Laws:
- move the NOT inside, AND becomes OR
- and move the NOT inside, OR becomes AND
In Java, De Morgan's Laws are written with the following operators:
- !(a && b) is equivalent to !a || !b
- !(a || b) is equivalent to !a && !b
Going back to our example above, using De Morgan's Laws:
- !("blue" && "square") is equivalent to !("blue") or !("square")
You can also simplify negated boolean expressions that have relational operators like <,>, ==. You can remove
negation by moving it inside and flipping the relational operator to its opposite sign.
For example, (!) not (c equals d) is the same as saying c does not equal d.
An easy way to remember this is to:
- Move the NOT inside, flip the sign
- i.e. == becomes !=, < becomes>=, and > becomes <=
In this case, negating each term means using the “opposite” relational operator. For example:
- !(x < 5 && y==3) is the same as x >= 5 || y != 3
- !(x >= 1 || y != 7) is the same as x < 1 && y==7
It may help to read these examples out loud in English. For instance, "If I
don't want the case where x is less than 5 and y is 3, then I
need x to be greater than or equal to 5, or I need y to be anything but
3."
You should be able to show that two boolean expressions are equivalent.
One way to do this is by using truth tables.
For example, we can show that !(a && b) == !a || !b by constructing the truth table below
and seeing that they give identical results for the 2 expressions (the last 2 columns in the table below are
identical!):
a |
b |
!(a && b) |
!a || !b |
true |
true |
false |
false |
false |
true |
true |
true |
true |
false |
true |
true |
false |
false |
true |
true |
Often, you can simplify boolean expressions to create equivalent expressions.
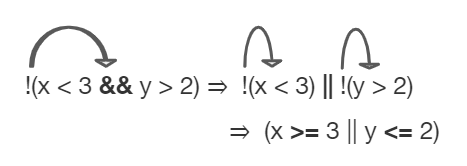
For example, applying De Morgan's Laws to !(x < 3 && y> 2) yields !(x < 3) || !(y> 2) as seen in the
figure below.
This can then be simplified further by moving the not operator inside and flipping the relation
operators.
So, !(x < 3) || !(y> 2) is simplified to (x >= 3 || y <= 2) where the relational operators are flipped
and the negation is removed.
These two simplification steps are seen below.
Our programs have so far been linear. In other words, the programs have executed from top to bottom without
major surprises or conditional
behavior.
However, we usually want to add conditional logic to our programs. By this we mean
functionality that's in one way or another
dependent on the state of the program's variables.
To branch the execution of a program based on user input, for example, we need to use something known as a
conditional statement.
The simplest conditional statement in Java is the if statement:
if (x > 0) {
System.out.println("x is positive");
}
An if statement specifies a statement(s) to be executed only if a particular boolean expression is
true
The expression in parentheses is called the condition.
- If it is true, the statements in braces get executed.
- If the condition is false, execution skips over that block of
code.
The condition in parentheses can be any boolean expression.
A second form of conditional statement has two possibilities, indicated by if and else.
The possibilities are called branches, and the condition determines which one gets executed:
if (x > 0) {
System.out.println("x is positive");
} else {
System.out.println("x is NOT positive");
}
If the value of x is greated than zero, we know that x is positive, and this code fragment displays a message
to that effect.
If the condition is false, the second print statement is executed instead. Since the condition must be true or false,
exactly one of the branches will run.
The braces are optional for branches that have only one statement. So we could have written the
previous example this way:
if (x > 0)
System.out.println("x is positive");
else
System.out.println("x is NOT positive");
However, it's better to use braces – even when they are optional – to avoid
making the mistake of adding statements to an if or else block and forgetting
to add the braces.
if (x > 0)
System.out.println("x is positive");
System.out.println("x is NOT positive");
This code is misleading because it's not indented correctly. Since there are no braces,
only the first println is part of the if statement. Here is what the compiler actually sees:
if (x > 0) {
System.out.println("x is positive");
}
System.out.println("x is NOT positive");
As a result, the second println runs no matter what.
Even experienced
programmers make this mistake; check out
Apple's
“goto fail” bug.
There is also a short-hand if else, which is known as the ternary operator because it consists of
three operands.
It can be used to replace multiple lines of code with a single line, and is most often used to replace simple
if/else statements:
The syntax is as follows:
So we can modify our previous if/else block using the ternary operator as follows:
String result = (x > 0) ? "x is positive" : "x is NOT positive";
System.out.println(result);
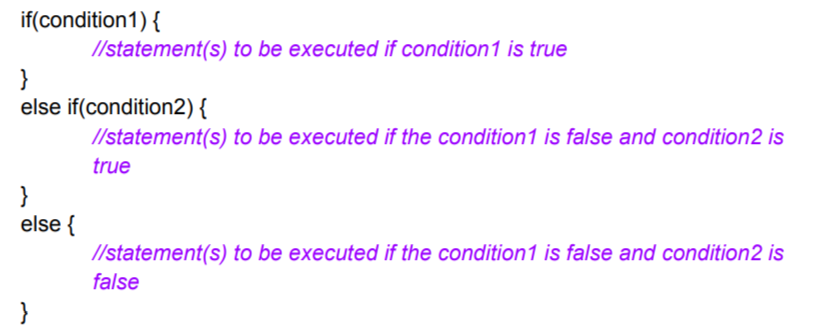
Sometimes you want to check related conditions and choose one of several
actions. One way to do this is by chaining a series of if and else statements.
We can use the else if statement to specify a new condition if the first condition is false.
These chains can be as long as you want, although they can be difficult to
read if they get out of hand.
One way to make them easier to read is to use
standard indentation, as demonstrated in these examples. If you keep all the
statements and braces lined up, you are less likely to make syntax errors.
We can modify out previous if/else block (either printing out "x is positive" or "x is NOT positive") to
include more specific options:
if (x > 0) {
System.out.println("x is positive");
} else if (x < 0) {
System.out.println("x is negative");
} else {
System.out.println("x is zero");
}
Now we can further specify for values of x that are not positive, whether they be 0 or a negative number.
In addition to chaining, you can also make complex decisions by nesting one
conditional statement inside another. We could have written the previous
example as:
if (x > 0) {
System.out.println("x is positive");
} else {
if (x < 0) {
System.out.println("x is negative");
} else {
System.out.println("x is zero");
}
}
The outer conditional has two branches.
The first branch contains a print
statement, and the second branch contains another conditional statement,
which has two branches of its own.
These two branches are also print statements, but they could have been conditional statements as well.
These kinds of nested structures are common, but they get difficult to read
very quickly. Good indentation is essential to make the structure (or intended
structure) apparent to the reader.
To store a true or false value,
you need a boolean variable.
You can create one like this:
boolean flag;//variable declaration
flag = true;//assignment
boolean testResult = false;//both declaration and assignment
Since relational operators evaluate to a boolean value, you can store the result of a comparison in a
variable:
boolean positiveFlag = (x > 0);//true if x is positive
boolean negativeFlag = (x < 0);//true if x is negative
boolean zeroFlag = (x == 0);//true if x is zero
The parentheses are unnecessary, but they make the code easier to read.
A variable defined in this way is called a flag, because it signals or “flags” the presence or absence
of a condition.
You can use flag variables as part of a conditional statement later:
if (positiveFlag){
System.out.println("x is positive");
}
Notice that you don't have to write if (evenFlag == true). Since
evenFlag
is a boolean, it's already a condition. Likewise, to check if a flag is
false:
if (!positiveFlag){
System.out.println("x is NOT positive");
}
Instead of writing many if/else statements, we can use the switch statement.
Unlike if-then and if-then-else statements, the switch statement can have a number of possible execution
paths.
A switch works with the byte, short, char, and int primitive data types. It also works with
enumerated types (special data type that enables for a variable to be a set of predefined constants),
the String class, and a few special classes that wrap certain primitive types: Character, Byte, Short, and
Integer
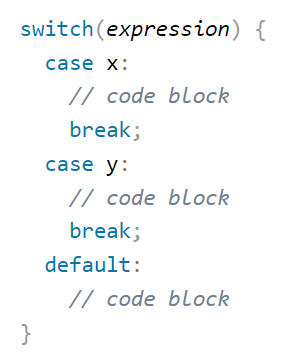
The switch statement selects one of many code blocks to be executed:
This is how it works:
- The switch expression is evaluated once.
- The value of the expression is compared with the values of each case.
- If there is a match, the associated block of code is executed.
- The break and default keywords are optional, but extremely useful. We'll talk about this in
a bit.
Let's try an example that reads in a number and uses it to calculate the day of the week:
Scanner sc = new Scanner (System.in);
System.out.print("Enter a number (1-7): ");
int day = sc.nextInt();
Now, let's write some code that will represent the following:
- Monday
- Tuesday
- Wednesday
- Thursday
- Friday
- Saturday
- Sunday
When Java reaches a break keyword, it breaks out of the switch block.
This will stop the execution of more code and case testing inside the block.
When a match is found, and the job is done, it's time for a break. There is no need for more testing.
A break can save a lot of execution time because it "ignores" the execution of all the rest of the code in
the switch block.
The default keyword specifies some code to run if there is no case match.
Note that if the default statement is used as the last statement in a switch block, it does not need a
break.
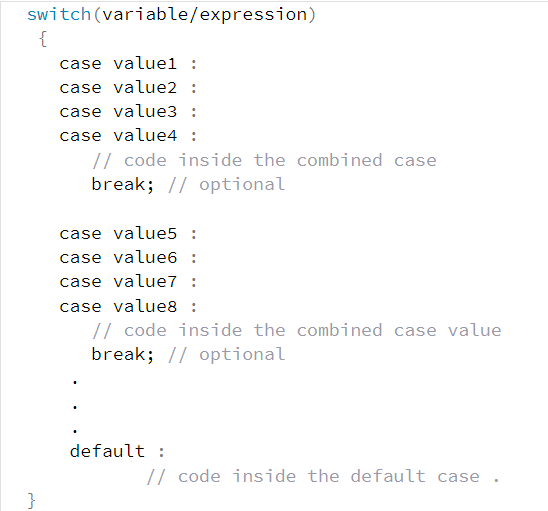
If the same outcome applies to more than one case we can also combine cases.
In modern Java (14+), the switch statement got a significant upgrade with the introduction of arrow notation (->)
switch (day) {
case 1 -> System.out.println("Monday");
case 2 -> System.out.println("Tuesday");
case 3 -> System.out.println("Wednesday");
case 4 -> System.out.println("Thursday");
case 5 -> System.out.println("Friday");
case 6 -> System.out.println("Saturday");
case 7 -> System.out.println("Sunday");
default -> System.out.println("Invalid input! Please enter a number between 1 and 7.");
};
The following rules apply:
- Before the arrow, you may list several cases separated by commas
- The arrow may be followed by either a single code statement or a code block in curly braces
- break statements are omitted in this notation
For example, if we need to determine if the day happened to be a weekday or a weekend:
switch (day) {
case 1, 2, 3, 4, 5 -> System.out.println("Weekday");
case 6, 7 -> System.out.println("Weekend");
default -> System.out.println("Invalid input! Please enter a number between 1 and 7.");
};
Let's say we needed to save the String literal in a variable (maybe we need it for something later), we can use switch to assign a case-specific value to a variable.
In the following example, instead of printing the actual day represented by the integer, we store it in the dayOfTheWeek variable:
String dayOfTheWeek;
switch (day) {
case 1 -> dayOfTheWeek = "Monday";
case 2 -> dayOfTheWeek = "Tuesday";
case 3 -> dayOfTheWeek = "Wednesday";
case 4 -> dayOfTheWeek = "Thursday";
case 5 -> dayOfTheWeek = "Friday";
case 6 -> dayOfTheWeek = "Saturday";
case 7 -> dayOfTheWeek = "Sunday";
default -> System.out.println("Invalid input! Please enter a number between 1 and 7.");
};
To use the variable, dayOfTheWeek, afterward, this conventional notation – even though we've covered every weekday – requires us to initialize the variable beforehand.
Otherwise, the compiler would abort with the error message "Variable 'dayOfTheWeek' might not have been initialized".
String dayOfTheWeek = "N/A"; //initialize to default
then we should be able to print out the day (however we have not done any error prevention this particular example ... yet):
String dayOfTheWeek = "N/A"; //initialize to default
switch (day) {
case 1 -> dayOfTheWeek = "Monday";
case 2 -> dayOfTheWeek = "Tuesday";
case 3 -> dayOfTheWeek = "Wednesday";
case 4 -> dayOfTheWeek = "Thursday";
case 5 -> dayOfTheWeek = "Friday";
case 6 -> dayOfTheWeek = "Saturday";
case 7 -> dayOfTheWeek = "Sunday";
default -> System.out.println("Invalid input! Please enter a number between 1 and 7.");
};
System.out.printf("The day of the week is %s%n", dayOfTheWeek);
Now that we have learned a bit more about user input and choices, what about if the choices AREN'T numbers?
What if they were letters? Or symbols?
The char data type is used to store a single character. The character must be surrounded by
single quotes, like 'A' or 'c'
char choice = 'B';
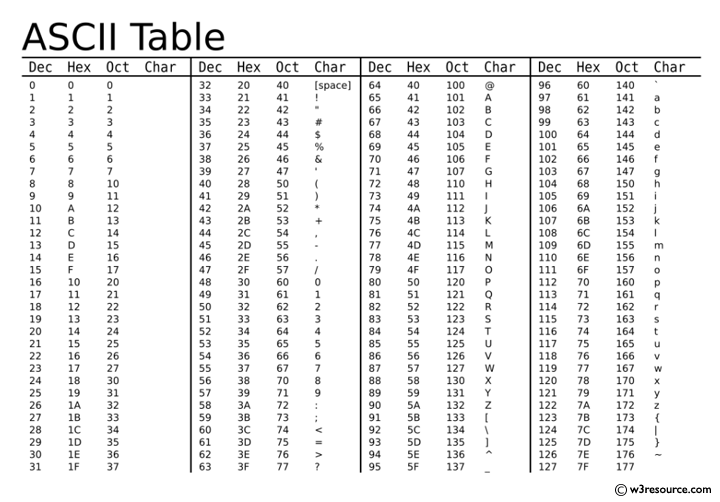
Alternatively, we can use ASCII values, you can use those to display certain characters:
char first = 65;
char second = 66;
char third = 67;
System.out.println(first);
System.out.println(second);
System.out.println(third);
Unfortunately the Scanner class does not have a specific method used to read in char values the same we we
can ints (.nextInt()), doubles (.nextDouble()), etc.
However, since we CAN read in Strings and Strings are made up of character values, there is a way around
this:
char choice = sc.next().charAt(0);
The .charAt() method returns the character at the specified index in a String and the
index of the first character is 0 (we will talk more about the other characters when we talk more about
Strings and their methods)
Doing this is a loophole to read in char values from the keyboard.
Programs are often used to automate repetitive tasks. Running the same code multiple times is called
iteration.
Java provides language features that make iteration easy: loops such as the while loop,
the do-while loop, and the for loop.
In programming, loops are important to learn and understand
how to use to be able to create dynamic programs that can do a lot of different things.
Loops are a programming element that repeat a portion of code a set number of times until the desired process
is complete.
Repetitive tasks are common in programming, and loops are essential to save time and minimize errors.
Think about HW 1 and part 1 of HW 2: we processed the required medical dosage for a set of patients.
Each patient's dosage is calculated EXACTLY the same way:
- First by reading in the patient's weight,
- Then by converting the weight
from pounds (lbs) to kilograms (kg),
- Lastly, we multiply the weight in kilograms by 30 since each kilogram of weight requires
a dosage of 30 milligrams (mg)
Instead of rewriting the block of code for each new patient, we can implement a loop!
When programmers write code, loops allow them to shorten what could be hundreds of lines of code to just a
few.
This allows them to write the code once and repeat it as many times as needed, making it more likely for the
program to run
as expected (less chance of error).
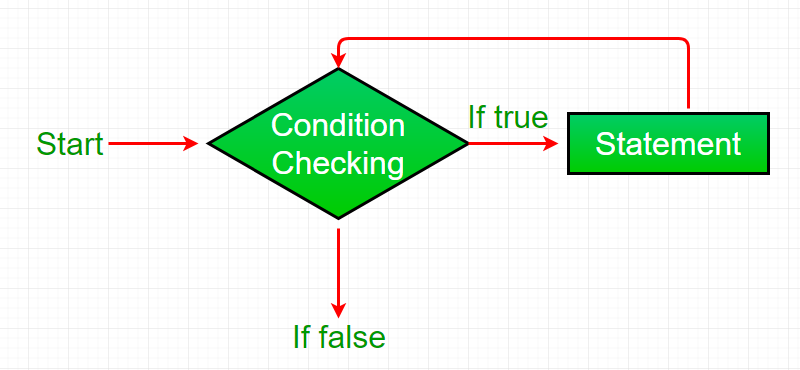
A while loop is a control flow statement that allows code to be executed repeatedly based on a given boolean condition.
The while loop can be thought of as a repeating if statement.
The expression in parentheses is called the condition. The statements in braces
are called the body. The flow of execution for a while statement is:
- Evaluate the condition, yielding true or false.
- If the condition is false, skip the body and go to the next
statement.
- If the condition is true, execute the body and go back to step 1.
This type of flow is called a loop, because the last step loops back around to
the first.
The while Loop vs The if Statement
You may find that the breakdown of the while loop sounds quite similar to the parts that make up the if
statement that we previous discussed.
And you would be right!
There are similarities in the structure of both concepts, however, there are a
significant differences as well.
An if statement, when true, will only execute the inner
block of code once.
In contrast, a while loop will continue to execute the inner block of code as long as the condition
is true.
If the condition is initially false (in either case), the inner block
of code will never execute.
The body of the loop should change the value of one or more variables so that,
eventually, the condition becomes false and the loop terminates.
The termination is important, otherwise the loop will repeat forever, which is called an infinite
loop.
An endless source
of amusement for computer scientists is the observation that the directions on
shampoo, “Lather, rinse, repeat,” are an infinite loop.
For example, we can write a simple loop to act as a countdown:
int n = 10;
while (n > 0) {
System.out.println(n);
n = n - 1;
}
System.out.println("Blastoff!");
You can almost read the while statement like English:
"While n is greater
than zero, print the value of n and then reduce the value of n by 1. When you
get to zero, print Blastoff!"
In this case, the loop terminates when n is no longer positive. But in general, it is not so easy to tell
whether a loop terminates.
The Collatz conjecture is one of the most famous unsolved problems in mathematics, named after Lothar
Collatz.
The conjecture asks whether repeating two simple arithmetic operations will eventually transform every
positive integer into 1.
The problem is stated as follows:
- Start with any positive integer n
- If n is even, the next number is n/2
- If n is odd, the next number is 3n+1
The conjecture is that these sequences always reach 1 (more specifically ends in the values 4, 2, 1),
no matter which positive integer is chosen to start the sequence.
import java.util.Scanner;
public class CollatzConjecture {
public static void main(String [] args) {
Scanner sc = new Scanner(System.in);
System.out.print("Enter a posititve Integer: ");
int x = sc.nextInt();
System.out.println(x);
while (x != 1) { //until x is equal to 1
if (x % 2 == 0) { //x is even
x = x / 2;
System.out.println(x);
} else { //x is odd
x = 3 * x + 1;
System.out.println(x);
}
}
}
}
Each time through the loop, the program displays the value of x and then
checks whether it is even or odd.
If it is even, the value of x is divided by two.
If it is odd, the value is replaced by 3x + 1.
For example, if the starting value
(the argument passed to sequence) is 3, the resulting sequence is 3, 10, 5, 16,
8, 4, 2, 1.
Since x sometimes increases and sometimes decreases, there is no obvious proof
that x will ever reach 1 and that the program will ever terminate.
However, the rules of Collatz Conjecture lets us know that it will.
The hard question is whether this program terminates for all values of x. So
far, no one has been able to prove it or disprove it!
Loops are good for generating and displaying tabular data.
The following code starts with an integer n and then use a loop to display a multiplication table with a
sequence of
values (n*1, n*2, ... etc.) in the left column and the results in the right column (after the equal sign):
Let's trace it!
int n = 9;
int i = 1;
while(i <= 10) {
System.out.printf("%d * %d = %d \n", n, i, n * i);
i++;
}
Sometimes, we know in advance how many times we want to do something, i.e.:
- do this ten times
- do this five times
- pick a random number, and do it that many times
We can do that sort of thing with a while loop, but we have to use a counter.
A counter variable in Java is a special type of variable which is used in the loop to count the
repetitions or to know about in which
repetition we are in.
In simple words, a counter variable is a variable that keeps track of
the number of times a
specific piece of code is executed.
The counter variable is declared and used in the same way as the normal variables are declared and used.
The counter variable can be of only integer type because it is very easy to increase the value of integer
type variable.
The counter variable is very easy to understand and use. The technique of using the counter variable in Java
is as follows:
Before the repeating cycle, we have to initialize it to zero.
After that, we're going to be adding 1 to the counter everytime we repeat the loop.
And when the counter reaches a predetermined value, we'll stop looping.
Let's take a simple example to understand the concept of the counter variable in Java:
int count = 0;// count is initialized
while (count <= 10) {// count is tested
System.out.print(count + " ");
count++;// count is incremented, increased by 1
}
The first statement in the loop prints value of count.
The second statement uses the increment operator to add one to number.
After it executes, the loop starts over. It tests the boolean expression again.
If it is true, the statements in the body of the loop are executed.
This cycle repeats until the boolean expression number <= 10 is false.
The loop in above example is controlled by a counter, so it is known as a counter controlled loop.
However, while loops are best for repeating as long as something is true:
- keep going as long as they keep typing in a positive number
- keep going as long as they haven't typed in a zero
The loop in next example is a sentinel controlled loop, a special value (the "sentinel")
that is used to signify
when the loop is done.
public static void main(String [] args) {
int sum = 0;// initialize the sum
int count = 0;//initialize counter
//create a Scanner object for keyboard input.
Scanner sc = new Scanner(System.in);
//get the first value.
System.out.print("Enter first integer (enter 0 to quit): ");
int value = sc.nextInt();
while (value != 0) {
count++;//increment count for each value
sum = sum + value;//add value to sum
//get next value from the user to avoid infinite loop!
System.out.print("Enter next integer (enter 0 to quit): ");
value = sc.nextInt();
}
//display the total sum and count
System.out.println("Sum of the integers: " + sum);
System.out.println("Total integers entered: " + count);
}
Here the loop allows the user to keep entering numbers (and adding the entered numbers to the running sum
and counting how many numbers are entered)
UNTIL the user enters a zero.
Pretest vs Posttest Loops
Now that we know a bit about iteration, let's discuss the different types:
A pretest loop tests its condition before each iteration.
Examples include:
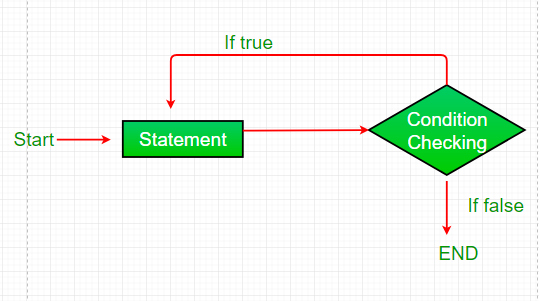
A posttest loop tests its condition after each iteration.
A posttest loop will always execute at least once.
Examples include:
This type of loop is useful when you need to run the body of the loop at least once.
The do-while loop is a variant of the while loop.
It is very similar to the while loop with one distinct difference.
So let's discuss the specific behavior that separates them from each other:
- As previously discussed, the while loop checks the condition first, and if it returns true, the code within it runs.
The loop continues until the condition provided returns false, then
stops.
- Alternatively, the do-while loop runs its code once before checking the condition and runs again
only if the condition is true.
This continues until the condition check returns false, then it stops
before the next loop starts.
The loop will always be executed at least once, even if the condition is false,
because the code block is executed before the condition is tested.
The execution of do-while loop is as follows:
- Enter the do-while loop
- The statements inside the body of the loop get executed
- Any updation takes place
- The flow jumps to Condition
- The Condition is tested
- If Condition yields true, go to Step 6
- If Condition yields false, the flow goes outside the loop
- The flow goes back to Step 2
As aforementioned, the do-while loop is useful for when you want to execute something at least once.
As for a good example for using do-while vs. while, lets say we want to modify our previous Medical Dosage
Calculator.
We could approach this by using a while loop and checking after each calculation if the person wants to exit
the program (as we discussed last class)
public static void main(String [] args) {
final double LBS_TO_KG = 0.45359237;
final double DOSE_PER_KG = 30;
Scanner sc = new Scanner(System.in);
//create count to keep track of # of patients
int count = 0;
//prompt user to interact
System.out.print("Would you like to enter a patient? (Y/N):");
//identify new patient Y/N?
char op = sc.next().charAt(0);//reads in Y or N
while (op != 'N' && op != 'n') {
System.out.print("Enter patient's weight: ");
double weight = sc.nextDouble();
double kilo = weight * LBS_TO_KG;
double dosage = kilo * DOSE_PER_KG;
count++;
System.out.printf("Dosage required for Patient %d is: %.2f%n%n",
count, dosage);
//prompt user to interact
System.out.print("Would you like to enter another patient? (Y/N): ");
//identify new patient Y/N?
op = sc.next().charAt(0);//reads in Y or N
}
System.out.printf("%nTotal number of patients processed: %d%n", count);
}
Now we can probably assume that once the program is opened the user wants to
interact with it at least once so we could modify our code to use a do-while loop.
We have already seen the break statement used earlier, it was used to "jump out" of a switch
statement.
The break statement can also be used to jump out of a loop.
The following example stops the loop when i is equal to 4 despite the original condition of the while
loop:
int i = 0;
while (i < 10) {
System.out.println(i);
i++;
if (i == 4) {
break;
}
}
The continue statement breaks one iteration (in the loop), if a specified condition occurs,
and continues with the next iteration in the loop
The following example skips the value of 4:
int i = 0;
while (i < 10) {
if (i == 4) {
i++;//why do we need to do this?
continue;
}
System.out.println(i);
i++;
}
For example, we can use a do-while loop to keep reading input
until it's valid:
Scanner in = new Scanner(System.in);
boolean okay;
do {
System.out.print("Enter a number: ");
if (in.hasNextDouble()) {
okay = true;
} else {
okay = false;
String word = in.next();
System.out.println(word + " is not a number");
}
} while (!okay);
double x = in.nextDouble();
System.out.println("\nYou entered the number: " + x);
Although this code looks complicated, it is essentially only three steps:
- Display a prompt
- Check the input; if invalid, display an error and start over
- Read the input
The code uses a flag variable, okay, to indicate whether we need to repeat the
loop body.
If .hasNextDouble() returns false, we consume
the invalid input
by calling .next(). We then display an error message.
The
loop terminates when .hasNextDouble() returns true.
A simpler way to solve this problem is to use a break statement.
Scanner in = new Scanner(System.in);
while (true) {
System.out.print("Enter a number: ");
if (in.hasNextDouble()) {
break;
} else {
String word = in.next();
System.out.println(word + " is not a number");
}
}
double x = in.nextDouble();
System.out.println("\nYou entered the number: " + x);
Using true as a conditional in a while loop is an idiom that means
"loop
forever", or in this case "loop until you get to a break statement".
Although break and continue statements give you more control of the loop
execution, they can make code difficult to understand and debug.
Use them
sparingly.
The loops we have written so far have several elements in common.
They
start by:
- initializing a variable
- they have a condition that depends on that
variable
- and inside the loop they do something to update that variable
This
type of loop is so common that there is another statement, the for loop, that
expresses it more concisely.
When we know exactly how many times we want to loop through a block of code, we use the for loop
instead of a while loop.
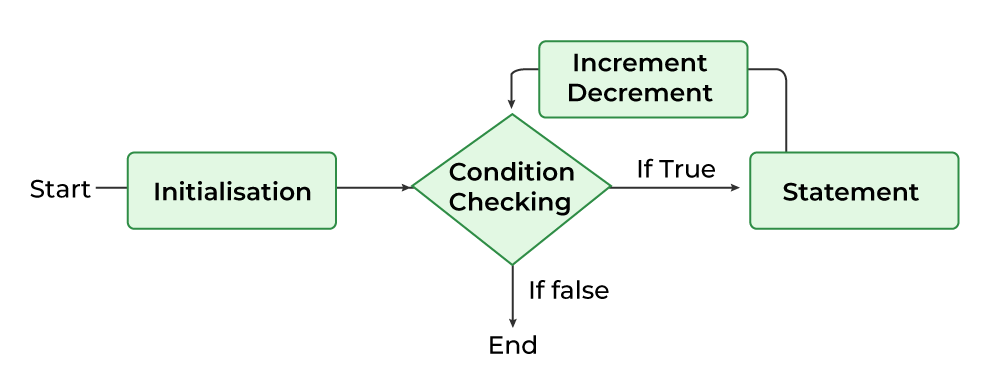
Unlike the while and do/while loops, the for loop has all three components enclosed in the parentheses,
separated by semicolons: the
initializer, the condition, and the update.
- The initializer runs once at the very beginning of the loop
- The condition is checked each time through the loop
- If it is false, the loop ends
- Otherwise, the body of the loop is executed (again)
- At the end of each iteration, the update runs, and we go back to step 2
The for loop is often easier to read because it puts all the loop-related statements at the top of the loop.
How does the for loop work?
- Control falls into the for loop, initialization is done
- The flow jumps to the Condition
- Condition is tested
- If the Condition is true, the flow goes into the body of the loop
- If the Condition is false, the flow goes outside the loop
- (If true) The statements inside the body of the loop get executed.
- The flow goes to the Updation
- Updation (the variable is updated) takes place and the flow goes to Step 3 again
- (If false) The for loop has ended and the flow has gone outside of
the loop
The example below will print the numbers 0 to 4 (inclusive):
for (int i = 0; i < 5; i++) {
System.out.println(i);
}
- The first statement in the parentheses, initializes a variable before the loop starts (int i = 0)
- The second defines the condition for the loop to run (i must be less than 5)
- If the condition is true, the loop will start over again
- If it is false, the loop will end
- The last part enclosed in the parentheses increases a value (i++) each time the code block in the
loop has been executed
There is one difference between for loops and while loops: if you declare a
variable in the initializer, it only exists inside the scope of the for loop.
For example, if we attempted to print out the value of i after the loop we would get an error:
for (int i = 0; i < 5; i++) {
System.out.println(i);
}
System.out.println(i); // compiler error
The last line tries to display i (for no reason other than demonstration) but
it won't work. If you need to use a loop variable outside the loop, you have to
declare it outside the loop, like this:
int i;
for (i = 0; i < 5; i++) {
System.out.println(i);
}
System.out.println(i);
Assignments like i = i + 1 don't often appear in for loops, because Java
provides a more concise way to add and subtract by one.
Specifically, ++ is
the increment operator; it has the same effect as i = i + 1.
And -- is the
decrement operator; it has the same effect as i = i - 1.
If you want to increment or decrement a variable by an amount other than 1,
you can use += and -=. For example, i += 2 increments i by 2.
This example will only print even values between 0 and 10 (inclusive):
for (int i = 0; i <= 10; i += 2) {
System.out.println(i);
}
How can we rewrite this so that it iterates over every number (not just the even ones)
but only prints out the even numbers (that way the output will be the same as the previous code)? (Hint: use
an if statement)
If a loop exists inside the body of another loop, it's called a nested loop. Here's an example of the
nested for loop:
for (int i = 1; i <= 2; i++) {// Outer loop
System.out.println("Outer: " + i);// Executes 2 times
for (int j = 1; j <= 3; j++) {// Inner loop
System.out.println(" Inner: " + j);// Executes 6 times (2 * 3)
}
}
The inner loop will be re-executed for each iteration of the outer loop.
Example: We can use the nested loop to iterate through each day of a week for 4 weeks (a month).
In this case, we can create a loop to iterate four times (4 weeks).
And, inside the loop, we can create another loop to iterate 7 times (7 days).
public static void main(String [] args) {
int weeks = 4;//4 weeks in a month (on average)
int days = 7;// 7 days in a week
// outer loop prints weeks
for (int i = 1; i <= weeks; i++) {
System.out.println("Week: " + i);
// inner loop prints days
for (int j = 1; j <= days; j++) {
System.out.println(" Day: " + j);
}
System.out.println();//skip a line for every new week
}
}
Alternate: for loop inside the while loop
We can write the same exact program only using a while loop as the outer loop instead. The following code
shows how:
int weeks = 4;
int days = 7;
int i = 1;//necessary for outer loop
// outer loop prints weeks
while (i <= weeks) {
System.out.println("Week: " + i);
// inner loop
for (int j = 1; j <= days; j++) {
System.out.println(" Days: " + j);
}
i++;//NEED TO INCREMENT
}
We can see that the output of both examples are the same.
Example: Nested loops to create a pattern
We can use the nested loop in Java to create patterns like full pyramid, half pyramid, inverted
pyramid, and so on.
Here is a program to create a half pyramid pattern using nested loops:
public static void main(String [] args) {
int rows = 5;
// outer loop
for (int i = 1; i <= rows; ++i) {
// inner loop to print the numbers
for (int j = 1; j <= i; ++j) {
System.out.print(j + " ");
}
System.out.println();
}
}
The Difference Between for, while, do/while Loops
There are several differences among the three types of loops in Java, such as the syntax, optimal time to
use, condition checking, and so on.
The table below represents some of the primary dissimilarities between all the loops in Java.
|
for Loop |
while Loop |
do/while Loop |
About |
the for loop iterates a given set of statements multiple times |
the while loop executes a set of instructions until a boolean condition is met |
the do/while loop executes a set of statements at least once, even if the condition is not
met.
After the first execution, repeats the iteration until the boolean condition is met |
Best time to use |
when you know the exact number of times to execute this particular part of the program. |
when you don't know how many times you want the iteration to repeat but you know when it should stop
(a sentinel value) |
when you don't know how many times you want the iteration to repeat (like the while loop), but it
should execute at least one time |
We have learned a bit about characters before (see: The char Data
Type) as another means of choice input, however, they can be used for
so much more!
But first, what are characters anyway?
We can think of a char in Java as a single letter in a word – it represents a single character,
and it's a fundamental part of Java programming.
To declare and use a char in Java, you use the char keyword before a variable name.
We can then manipulate and use this char in various ways in our programs.
char letter = 'A';
System.out.println(letter);
In the above example, we declare a char variable named letter and assign it the value 'A'.
We then print out the value of letter, which outputs 'A'.
Character literals, like 'a', appear in single quotes. Unlike string literals,
which appear in double quotes (""), character literals can only contain a single
character. Escape sequences, like '\t' or '\n', are legal because they represent a
single character.
This is a key difference between chars and strings in Java.
Chars are incredibly efficient in terms of memory usage.
Each char in Java takes up only 2 bytes of memory, making them a great choice when memory usage is a
concern.
However, as previously mentioned, chars in Java can represent a single character only.
If we need to work with multiple characters, we will need to use a string or an array of chars (we'll
talk about this more in a bit).
Also, remember that chars in Java are case-sensitive. This means that the char 'a' is different from
the char 'A'.
Always be mindful of this when working with chars in Java.
As you become more familiar with Java char, you'll find that there's a lot more you can do beyond simply
declaring and printing them.
Let's delve into some of these advanced techniques, such as manipulating and comparing characters.
We can perform arithmetic operations on chars in Java, similarly to ints and doubles.
This is because chars in Java are, in fact, numeric values representing Unicode characters.
The increment and decrement operators work perfectly normal with characters.
Here is an example:
char letter = 'A';
letter++;
System.out.println(letter);
In the above example, we increment the char 'A' by 1, which results in the char 'B'.
This is because in the Unicode character set, 'B' is one position after 'A'.
The character 'A' has a Unicode value of 65, so adding 1 to it results in the Unicode value of 66 or most
notably the char 'B'.
We can do the same with the other arithmetic operations as well! For example, subtraction:
char letter = 'W';
letter--;
System.out.println(letter); //What will this print out?
We can also use chars in loops, the following loop
displays the letters of the alphabet:
System.out.print("English alphabet: ");
for (char c = 'A'; c <= 'Z'; c++) {
System.out.print(c + " ");
}
System.out.println();
Just like with int or double we can also cast a number to a char using typecasting. (once again, see: The
char Data Type)
Characters work like the other primitive types we have seen. You can compare
them using relational operators:
char firstLetter = 'A';
char secondLetter = 'B';
System.out.println(firstLetter < secondLetter); //(T or F)
In this code snippet, we compare two chars 'A' and 'B'. Since 'A' comes before 'B' in the Unicode character
set,
the expression 'firstLetter < secondLetter' returns true.
Since, we can use relational operators with chars we can also use them in boolean conditions such as the
following:
if (firstLetter == 'A') {
System.out.println("The first letter is " + firstLetter);
}
While the char data type is a powerful tool for handling single characters in Java, there are alternative
approaches that offer additional functionality.
We will explore two of these: the Character wrapper class and using Strings.
Most of the time, if you are using a single character value, you will use the primitive char type.
However in programming, we come across situations where we need to use objects instead of primitive data
types.
In order to achieve this, Java provides wrapper class Character for primitive data type char.
Character is a wrapper class that "wraps" the char in a Character object.
An object of type Character contains a single field, whose type is char.
You can create a Character object with the Character constructor.
To create a Character object:
Character ch = new Character('A');
The above statement creates a Character object which contains 'A' of type char.
This Character class also offers a number of useful class (that is, static) methods for manipulating
characters.
The following table lists some of the most useful methods in the Character class:
Method |
Description |
boolean isLetter(char ch) boolean isDigit(char ch) |
Determines whether the specified char value is a letter or a digit, respectively. |
boolean isWhitespace(char ch) |
Determines whether the specified char value is white space. |
boolean isUpperCase(char ch) boolean isLowerCase(char ch) |
Determines whether the specified char value is uppercase or lowercase, respectively. |
char toUpperCase(char ch) char toLowerCase(char ch) |
Returns the uppercase or lowercase form of the specified char value. |
toString(char ch) |
Returns a String object representing the specified character value that is, a
one-character string. |
For a complete listing of all methods in this class (there are more than 50),
refer to the java.lang.Character API
specification.
Here is an example of using the Character class to convert a char to uppercase:
char lowercaseLetter = 'a';
char uppercaseLetter = Character.toUpperCase(lowercaseLetter);
System.out.println(uppercaseLetter);
In this example, we use the .toUpperCase() method of the Character class to convert the lowercase char 'a' to an
uppercase 'A'.
Strings are the type of objects that can store the character of values and in Java.
A String class object acts the same as an array of characters in Java.
In Java, objects of the
String class
are immutable which means that they are constant and cannot be changed once created.
A String variable contains a collection of characters surrounded by double quotes.
There are two ways to create a String in Java:
- By String literal:
String greeting1 = "Hello!";
- By new keyword:
String greeting2 = new String("Hello!");
A String in Java is actually an object, which means that it contains methods that can perform certain
operations on Strings.
A couple of the methods, toUpperCase() and toLowerCase() convert from
uppercase to lowercase and back. These methods are often a source of confusion, because it sounds like they
modify strings. But neither these methods
nor any others can change a string, because strings are immutable
When you invoke toUpperCase() on a string, you get a new string object as a
return value. For example:
String name = "Alan Turing";
String upperName = name.toUpperCase();
After these statements run, upperName refers to the String "ALAN TURING".
But name still refers to "Alan Turing".
Another useful method is replace(), which finds and replaces instances of one
String within another. This example replaces "Computer Science" with "CS":
String text = "Computer Science is fun!";
text = text.replace("Computer Science", "CS");
This example demonstrates a common way to work with String methods.
It invokes text.replace(), which returns a reference to a new String: "CS is fun!".
Then it assigns the new string to text, replacing the old String.
This assignment is important; if you don’t save the return value, invoking
text.replace() has no effect.
Strings provide a method called length() that returns the number of characters
in the string.
For example:
String fruit = "banana";
System.out.println("The length of the String is: " + fruit.length());
The Java String class charAt() method returns a char value at the given index number.
Since a String is technically an array of characters, the index number starts from 0 and goes to n-1,
where n is the length of the string.
char ch = fruit.charAt(2);//returns the char value at the 2nd index
System.out.println(ch);
To find the last letter of a string, you might be tempted to try something like:
int length = fruit.length();
char last = fruit.charAt(length);//wrong!
This code compiles and runs, but invoking the charAt method throws a
StringIndexOutOfBoundsException.
The problem is that there is no letter at the sixth
index in "banana". Since we started counting at 0, the 6 letters are indexed
from 0 to 5.
To get the last character, you have to subtract 1 from length.
int length = fruit.length();
char last = fruit.charAt(length - 1);//correct!
Many String traversals involve reading one String and creating another. For
example, to reverse a String, we simply add one character at a time:
String reverse = "";
for (int i = fruit.length() - 1; i >= 0; i--) {
reverse = reverse + fruit.charAt(i);
}
System.out.println(reverse);
The initial value of reverse is "", which is the empty String.
The loop traverses
the letters of fruit in reverse order. Each time through the loop, it creates a new
String and assigns it to reverse. When the loop exits, reverse contains the letters from fruit
in reverse order.
So the result of when fruit is "banana" is "ananab".
The .substring() method returns a new string that copies letters from an existing string, starting
at the given index.
For example:
- fruit.substring(0) returns "banana"
- fruit.substring(2) returns "nana"
- fruit.substring(6) returns ""
The first example returns a copy of the entire String. The second example
returns all but the first two characters. As the last example shows, substring
returns the empty String if the argument is the length of the String.
To visualize how the substring method works, it helps to draw a picture like the following:
Like most String methods, .substring() is overloaded. That is, there are other
versions of .substring() that have different parameters. If it's invoked with two
arguments, they are treated as a start and end index:
- fruit.substring(0, 3) returns "ban"
- fruit.substring(2, 5) returns "nan"
- fruit.substring(6, 6) returns ""
Notice that the character indicated by the end index is not included.
Defining .substring() this way simplifies some common operations.
For example,
to select a .substring() with length len, starting at index i, you could write
fruit.substring(i, i + len).
The .indexOf() method searches for a character in a String.
There are four variants of the .indexOf() method:
- int indexOf()
- This method returns the index within this string of the first occurrence of the specified character or
-1,
if the character does not occur.
- int indexOf(char ch, int strt)
- This method returns the index within this string of the first occurrence of the specified character,
starting the search at the specified index or -1, if the character does not occur.
- int indexOf(String str)
- This method returns the index within this string of the first occurrence of the specified substring.
If it does not occur as a substring, -1 is returned.
- int indexOf(String str, int strt)
- This method returns the index within this string of the first occurrence of the specified substring,
starting at the specified index. If it does not occur, -1 is returned.
This example finds the index of 'a' in the String:
String fruit = "banana";
int index = fruit.indexOf('a');
But the letter appears three times, so it's not obvious what .indexOf() should do.
According to the
documentation, it returns the index of the first appearance.
To find subsequent appearances, you can use the second version of .indexOf(), which
takes a second argument that indicates where in the String to start looking.
int index = fruit.indexOf('a', 2);
This code starts at index 2 (the first 'n') and finds the next 'a', which is
at index 3. If the letter happens to appear at the starting index, the starting
index is the answer. So fruit.indexOf('a', 5) returns 5.
We can also find the last occurrence of a character.
The .lastIndexOf() method returns the position of the last occurrence of specified character(s) in a
String.
Like .indexOf(), there are four variants of the .lastIndexOf() method:
To compare two Strings, it may be tempting to use the == and != operators.
String name1 = "Alan Turing";
String name2 = "Ada Lovelace";
if (name1 == name2) { // wrong!
System.out.println("The names are the same.");
}
This code compiles and runs, and most of the time it gets the answer right.
But it is not correct, and sometimes it gets the answer wrong.
The problem is
that the == operator checks whether the two variables refer to the same object (by comparing the references).
If you give it two different Strings that contain the same letters, it yields false.
The right way to compare Strings is with the equals method, like this:
if (name1.equals(name2)) {
System.out.println("The names are the same.");
}
This example invokes equals on name1 and passes name2 as an argument.
The equals method returns true if the strings contain the same
characters;
otherwise it returns false.
If the Strings differ, we can use the .compareTo() method to see which comes first in alphabetical order:
int diff = name1.compareTo(name2);
if (diff == 0) {
System.out.println("The names are the same.");
} else if (diff < 0) {
System.out.println("name1 comes before name2.");
} else if (diff > 0) {
System.out.println("name2 comes before name1.");
}
The return value from .compareTo() is the difference between the first characters
in the strings that differ.
- If the Strings are equal, their difference is zero.
- If the first String (the one on which the method is invoked) comes first in the
alphabet, the difference is negative.
- Otherwise, the difference is positive.
In the preceding code, compareTo returns positive 8, because the second letter
of "Ada" comes before the second letter of "Alan" by 8 letters.
Both .equals() and .compareTo() are case-sensitive. The uppercase letters come
before the lowercase letters, so "Ada" comes before "ada".
The .equalsIgnoreCase() method compares two Strings, ignoring lower case and upper case differences.
This method returns true if the Strings are equal, and false if not.
Use the .compareToIgnoreCase() method to compare two Strings lexicographically, ignoring case
differences.
The String .split() method breaks a String around matches of the given regular expression (regex).
After splitting against the given regular expression, this method returns a String array.
Regex characters are either metacharacters or regular characters.
Metacharacters have a specific meaning.
In regex, the period "." is a metacharacter that stands in
for any character. We can use ".." in regex to represent a pattern of any two characters.
It could be "aa", "!2", "y)" or any other combination.
If we want to search specifically for let's say a filename that ends in “.rb” we could use "r" and "b"
as is because they are regular characters which have a literal meaning.
To get the period we have to use a backslash in front to make it an escaped character.
Since regexes in Java are normal Java strings, we need to escape the backslash itself, so we need two
backslashes e.g. \\.
Example:
public static void main(String [] args) {
String text = "Java is a fun programming language";
// split string from space
String [] result = text.split(" ");
System.out.print("result = ");
for (String str : result) {
System.out.print(str + ", ");
}
}
Another Example:
public static void main(String [] args) {
String str = "Let's:split:another:String";
String [] arrOfStr = str.split(":");
for (String a : arrOfStr) { //enhanced for loop
System.out.println(a);
}
}
In the example above, we use : as the delimiter, so the original String is split into an array of individual
Strings separated by the colon (:).
Let's split on a period:
public static void main(String [] args) {
String str = "Let's.try.to.split.this.String";
String [] arrOfStr = str.split("\\.");
for (String a : arrOfStr) {
System.out.println(a);
}
}
If the String consists of only the split character, the output will be an empty array.
public static void main(String [] args) {
String str = "::::";
String [] arrOfStr = str.split(":");
System.out.println(arrOfStr.length);
}
The output will be 0.
Similarly, if you split an array on everything, the output will be nothing.
public static void main(String [] args) {
String str = "java";
String [] arrOfStr = str.split(".");
System.out.println(arrOfStr.length);
}
The output will be output 0.
If you split an array on nothing, the output will be everything.
public static void main(String [] args) {
String str = "java";
String [] arrOfStr = str.split("");
for (String a : arrOfStr) {
System.out.println(a);
}
}
Primitive values (like ints, doubles, and chars) do not provide methods. For
example, you can't call equals on an int:
int i = 5;
System.out.println(i.equals(5)); // compiler error
But for each primitive type, there is a corresponding class in the Java library,
called a wrapper class. We already spoke a bit about the wrapper class for char, Character.
For
int it is called Integer. Other wrapper classes include Boolean, Long, and
Double. They are in the java.lang package, so you can use them without
importing them.
Each wrapper class defines constants MIN_VALUE and MAX_VALUE. For example,
Integer.MIN_VALUE is -2147483648, and Integer.MAX_VALUE is 2147483647.
Because these constants are available in wrapper classes, you don't have to
remember them, and you don't have to include them in your programs.
Wrapper classes provide methods for converting Strings to other types. For
example, Integer.parseInt() converts a String to (you guessed it) an integer:
String str = "12345";
int num = Integer.parseInt(str);
In this context, parse means something like “read and translate”.
The other wrapper classes provide similar methods, like Double.parseDouble()
and Boolean.parseBoolean(). They also provide .toString(), which returns a
String representation of a value:
int num = 12345;
String str = Integer.toString(num);
The result is the String "12345".
So far we have only written short programs that have a single class and a single
method (main).
Now, we will expand our programs to utilize more than one method. But first, what is a method anyway?
A method in Java is a block of code that, when called, performs specific actions mentioned in
it.
For instance, if you have written instructions to draw a circle in the method, it will do that task.
You can insert values or parameters into methods, and they will only be executed when called.
They are also referred to as functions.
The primary uses of methods in Java are:
- It allows code reusability (define once and use multiple times)
- It breaks a complex program into smaller chunks of code
- It increases code readability
We have seen methods before through our use of class objects. Classes such as Math, Character, and Scanner
all have methods that help
us simplify the work we need to do as programmers.
In mathematics, you have probably seen functions like sin and log, and you
have learned to evaluate expressions like sin(π/2) and log(1/x).First, you
evaluate the expression in parentheses, which is called the argument of the
function. Then you can evaluate the function itself, maybe by punching it into
a calculator.
Remember, we can use, or invoke, Math methods like this:
double root = Math.sqrt(17.0);
double angle = 1.5;
double height = Math.sin(angle);
The first line sets root to the square root of 17. The third line finds the sine
of 1.5 (the value of angle).
We can change the values passed as arguments to these methods and they will use the same approach to compute
the result based on this
new value. That reusability is one of the main benefits of methods.
Just as with mathematical functions, Java methods can be composed. That
means you can use one expression as part of another. For example, you can
use any expression as an argument to a method:
double x = Math.cos(angle + Math.PI / 2.0);
This statement divides Math.PI by two, adds the result to angle, and computes the cosine of the sum.
You can also take the result of one method and pass it as an argument to another:
double y = Math.exp(Math.log(10.0));
In Java, the log method always uses base e. So this statement finds the log
base e of 10, and then raises e to that power. The result gets assigned to y.
Some Math methods take more than one argument. For example, Math.pow()
takes two arguments and raises the first to the power of the second. This line
of code assigns the value 1024.0 to the variable z:
double z = Math.pow(2.0, 10.0);
When using Math methods, it is a common error to forget the Math. For
example, if you try to invoke pow(2.0, 10.0), you get an error message like:
The message "cannot find symbol" is confusing, but the last line provides a
useful hint. The compiler is looking for pow in the same class where it is used,
which is Test. If you don't specify a class name, the compiler looks in the
current class.
You have probably guessed by now that we can define more than one method
in a class, meaning that we can define our own methods for functionality.
There are a total of six components included in a method declaration. The components provide various
information about the method:
- Access Specifier
- This is used to define the access type of the method. Every method we write in this course will be
public, however, Java provides four different specifiers,
which are:
- public: You can access it from any class
- private: You can access it within the class where it is defined
- protected: Accessible only in the same package or other subclasses in another package
- default: It is the default access specifier used by the Java compiler if we don't mention any
other specifiers.
It is accessible only from the package where it is declared
- Return Type
- This defines the return type of the method. We can declare the return type as void if the method returns
no value.
- Method Name
- This is used to give a unique name to the method. It will be referred by this name when we invoke it.
- Parameter List
- This is a list of arguments (data type and variable name) that will be used in the method.
It can also be kept blank if we don't want to use any parameters in the method.
- Method Signature
- The method signature is just a combination of the method name and parameter list.
- Method Body
- This is the set of instructions enclosed within curly brackets that the method will perform.
Here's an example:
public class NewLine {
public static void newLine() {
System.out.println();
}
public static void main(String [] args) {
System.out.println("First line.");
newLine(); //this is a method call
System.out.println("Second line.");
}
}
The name of the class is NewLine. By convention, class names begin with a
capital letter. NewLine contains two methods, newLine and main. Remember
that Java is case-sensitive, so NewLine and newLine are not the same.
Method names should begin with a lowercase letter and use "camel case",
which is a cute name for jammingWordsTogetherLikeThis. You can use any
name you want for methods, except main or any of the Java keywords.
newLine and main are public, which means they can be invoked from other
classes. They are both static.
When you declare a variable or a method as static,
it belongs to the class, rather than a specific instance. This means that only one instance of a static
member exists,
even if you create multiple objects of the class, or if you don't create any.
It will be shared by all objects.
And they are both void, which means that they don't yield a result (unlike
the Math methods, for example).
The parentheses after the method name contain a list of variables, called parameters, where the
method stores its arguments.
The main method has a single parameter, called args, which has type String[]. That means that
whoever invokes
main must provide an array of Strings (we'll get to arrays in a later chapter).
Since newLine has no parameters, it requires no arguments, as shown when
it is invoked in main. And because newLine is in the same class as main, we
don't have to specify the class name.
What is the output of this program?
If we wanted more space between
the two lines, we could invoke the same method repeatedly:
public static void main(String [] args) {
System.out.println("First line.");
newLine(); //call 1
newLine(); //call 2
newLine(); //call 3
System.out.println("Second line.");
}
Or we could write a new method that displays three blank lines:
public static void threeLine() {
newLine();
newLine();
newLine();
}
public static void main(String [] args) {
System.out.println("First line.");
threeLine();
System.out.println("Second line.");
}
You can invoke the same method more than once, and you can have one method
invoke another. In this example, main invokes threeLine, and threeLine
invokes newLine().
Beginners often wonder why it is worth the trouble to create new methods.
There are many reasons, but this example demonstrates a few of them:
- Creating a new method gives you an opportunity to give a name to a
group of statements, which makes code easier to read and understand.
- Introducing new methods can make a program smaller by eliminating
repetitive code. For example, to display nine consecutive new lines, you
could invoke threeLine three times.
- A common problem solving technique is to break tasks down into subproblems.
Methods allow us to focus on each sub-problem in isolation,
and then compose them into a complete solution.
Pulling together the code from the previous section, the complete program
looks like this:
public class NewLine {
public static void newLine() {
System.out.println();//4, 6, 8
}
public static void threeLine() {
newLine();//3
newLine();//5
newLine();//7
}
public static void main(String[] args) {
System.out.println("First line."); //1
threeLine(); //2
System.out.println("Second line."); //9
}
}
When you look at a class definition that contains several methods, it is tempting to read it from top to
bottom.
But that is likely to be confusing, because
that is not the flow of execution of the program.
Execution always begins at the first statement of main, regardless of where it
is in the source file. Statements are executed one at a time, in order, until you
reach a method invocation, which you can think of as a detour. Instead of
going to the next statement, you jump to the first line of the invoked method,
execute all the statements there, and then come back and pick up exactly
where you left off.
That sounds simple enough, but remember that one method can invoke another one.
In the middle of main, we go off to execute the statements in
threeLine. While we are executing threeLine, we go off to execute newLine.
Then newLine invokes println, which causes yet another detour.
Fortunately, Java is good at keeping track of which methods are running.
So when println() completes, it picks up where it left off in newLine; when
newLine completes, it goes back to threeLine, and when threeLine completes, it gets back to main.
In summary, when you read a program, don't read from top to bottom. Instead, follow the flow of
execution.
Some of the methods we have used require arguments, which are the values
you provide when you invoke the method. For example, to find the square root of
a number, you have to provide the number, so Math.sqrt() takes a double as an
argument.
To display a message, you have to provide the message, so println
takes a String.
When you use a method, you provide the arguments. When you write a
method, you name the parameters. The parameter list indicates what arguments are required.
The following shows an example:
public static void printTwice(String s) {
System.out.println(s);
}
public static void main(String [] args) {
printTwice("Don't make me say this twice!");
}
printTwice has a parameter named s with type String. When we invoke
printTwice, we have to provide an argument with type String.
Before the method executes, the argument gets assigned to the parameter.
In this example, the argument "Don't make me say this twice!" gets assigned to the parameter s.
This process is called parameter passing because the value gets passed from
outside the method to the inside. An argument can be any kind of expression,
so if you have a String variable, you can use it as an argument:
String argument = "Never say never.";
printTwice(argument);
The value you provide as an argument must have the same type as the parameter. For example, if you
try:
printTwice(17); // syntax error
You will get an error message.
Sometimes Java can convert an argument from one type to another automatically.
For example, Math.sqrt() requires a double, but if you invoke
Math.sqrt(25), the integer value 25 is automatically converted to the floating point value 25.0.
But in the case of printTwice, Java can't (or won't) convert
the integer 17 to a String.
Parameters and other variables only exist inside their own methods. Inside
main, there is no such thing as s. If you try to use it there, you'll get a compiler
error. Similarly, inside printTwice there is no such thing as argument. That
variable belongs to main.
Because variables only exist inside the methods where they are defined, they
are often called local variables.
Here is an example of a method that takes two parameters:
public static void printTime(int hour, int minute) {
System.out.print(hour);
System.out.print(":");
System.out.println(minute);
}
In the parameter list, it may be tempting to write:
public static void printTime(int hour, minute) {
But that format (without the second int) is only legal for variable declarations.
In parameter lists, you need to specify the type of each variable separately.
To invoke this method, we have to provide two integers as arguments:
int hour = 11;
int minute = 59;
printTime(hour, minute);
A common error is to declare the types of the arguments, like this:
int hour = 11;
int minute = 59;
printTime(int hour, int minute); // syntax error
That's a syntax error; the compiler sees int hour and int minute as variable
declarations, not expressions. You wouldn't declare the types of the arguments
if they were simply integers:
printTime(int 11, int 59); // syntax error
Pulling together the code fragments from the previous section, here is a complete class definition:
public class PrintTime {
public static void printTime(int hour, int minute) {
System.out.print(hour);
System.out.print(":");
System.out.println(minute);
}
public static void main(String[] args) {
int hour = 11;
int minute = 59;
printTime(hour, minute);
}
}
printTime has two parameters, named hour and minute. And main has two
variables, also named hour and minute.
Although they have the same names,
these variables are not the same. hour in printTime and hour in main refer
to different storage locations, and they can have different values.
For example, you could invoke printTime like this:
int hour = 11;
int minute = 59;
printTime(hour + 1, 0);
Before the method is invoked, Java evaluates the arguments; in this example,
the results are 12 and 0. Then it assigns those values to the parameters. Inside
printTime, the value of hour is 12, not 11, and the value of minute is 0, not
59.
Furthermore, if printTime modifies one of its parameters, that change
has no effect on the variables in main.
One way to keep track of everything is to draw a stack diagram, which is
a state diagram that shows method invocations.
For each
method there is a box called a frame that contains the method's parameters and variables.
The name of the method appears outside the frame; the
variables and parameters appear inside.
As with state diagrams, stack diagrams show variables and methods at a particular point in time.
The following is a stack diagram at the beginning of the
printTime method.
A nice feature of the Java language is the
ability to embed documentation in your source code. That way, you can write
it as you go, and as things change, it is easier to keep the documentation
consistent with the code.
If you include documentation in your source code, you can extract it automatically,
and generate well-formatted HTML, using a tool called Javadoc
This tool is included in standard Java development environments, and it is widely used.
In fact, the online documentation of the Java libraries is generated by
Javadoc.
Javadoc scans your source files looking for specially-formatted documentation comments, also known as
“Javadoc comments”.
They begin with /** (two stars) and end with */ (one star). Anything in between is considered
part of the documentation.
Here's a class definition with two Javadoc comments, one for the class and one
for the main method:
/**
* Example program that demonstrates print vs println.
*/
public class Goodbye {
/**
* Prints a greeting.
*/
public static void main(String [] args) {
System.out.print("Goodbye, "); // note the space
System.out.println("cruel world");
}
}
The class comment explains the purpose of the class. The method comment
explains what the method does.
Notice that this example also includes an inline comment, beginning with
//. In general, inline comments are short phrases that help explain complex
parts of a program. They are intended for other programmers reading and
maintaining the source code.
In contrast, Javadoc comments are longer, usually complete sentences. They
explain what each method does, but they omit details about how the method
works. And they are intended for people who will use the methods without
looking at the source code.
Appropriate comments and documentation are essential for making source
code readable. And remember that the person most likely to read your code
in the future, and appreciate good documentation, is you.
Some of the methods we have used, like the Math methods, return values. But
all the methods we have written so far have been void; that is, they don't
return values. Now, we will begin discuss how to write methods that return values, which
we call value methods.
When you invoke a void method, the invocation is usually on a line all by
itself.
For example, here is a recursive method called countDown():
public static void countDown(int n) {
if (n == 0) {
System.out.println("Blastoff!");
} else {
System.out.println(n);
countDown(n - 1);
}
}
And here is how it is invoked:
countDown(3);
On the other hand, when you invoke a value method, you have to do something
with the return value. We usually assign it to a variable or use it as part of
an expression, like this:
double error = Math.abs(expected - actual);
double height = radius * Math.sin(angle);
Compared to void methods, value methods differ in two ways:
- They declare the type of the return value (the return type);
- They use at least one return statement to provide a return value.
Here's an example: calculateArea() takes a double as a parameter and returns
the area of a circle with that radius:
public static double calculateArea(double radius) {
double result = Math.PI * radius * radius;
return result;
}
As usual, this method is public and static. But in the place where we are
used to seeing void, we see double, which means that the return value from
this method is a double.
The last line is a new form of the return statement that includes a return
value. This statement means, "return immediately from this method and use
the following expression as the return value."
The expression you provide can
be arbitrarily complex, so we could have written this method more concisely:
public static double calculateArea(double radius) {
return Math.PI * radius * radius;
}
On the other hand, temporary variables like result often make debugging
easier, especially when you are stepping through code using an interactive
debugger.
The type of the expression in the return statement must match the return
type of the method. When you declare that the return type is double, you are
making a promise that this method will eventually produce a double value.
If you try to return with no expression, or an expression with the wrong type,
the compiler will generate an error.
Sometimes it is useful to have multiple return statements, for example, one in
each branch of a conditional:
public static double absoluteValue(double x) {
if (x < 0) {
return -x;
} else {
return x;
}
}
Since these return statements are in a conditional statement, only one will be
executed. As soon as either of them executes, the method terminates without
executing any more statements.
Code that appears after a return statement (in the same block), or any place
else where it can never be executed, is called dead code. The compiler will
give you an "unreachable statement" error if part of your code is dead.
For
example, this method contains dead code:
public static double absoluteValue(double x) {
if (x < 0) {
return -x;
} else {
return x;
}
System.out.println("This line is dead.");
}
If you put return statements inside a conditional statement, you have to
make sure that every possible path through the program reaches a return
statement. The compiler will let you know if that's not the case.
For example,
the following method is incomplete:
public static double absoluteValue(double x) {
if (x < 0) {
return -x;
} else if (x > 0) {
return x;
}
// syntax error
}
When x is 0, neither condition is true, so the method ends without hitting
a return statement. The error message in this case might be something like
"missing return statement", which is confusing since there are already two of
them. But hopefully you will know what it means.
Beginners often make the mistake of writing a lot of code before they try to
compile and run it. Then they spend way too much time debugging. A better
approach is what we call incremental development.
The key aspects of
incremental development are:
- Start with a working program and make small, incremental changes. At
any point, if there is an error, you will know where to look.
- Use variables to hold intermediate values so you can check them, either
with print statements or by using a debugger.
- Once the program is working, you can consolidate multiple statements
into compound expressions (but only if it does not make the program
more difficult to read).
As an example, suppose you want to find the distance between two points,
given by the coordinates (x1, y1) and (x2, y2). By the usual definition:
The first step is to consider what a distance method should look like in Java.
In other words, what are the inputs (parameters) and what is the output (return value)?
In this case, the two points are the parameters, and it is
natural to represent them using four double values. The return value is the
distance, which should also have type double.
Already we can write an outline for the method, which is sometimes called a
stub. The stub includes the method signature and a return statement:
public static double distance(double x1, double y1, double x2, double y2) {
return 0.0;
}
The return statement is a placeholder that is necessary for the program to
compile. At this stage the program doesn't do anything useful, but it is good
to compile it so we can find any syntax errors before we add more code.
It's usually a good idea to think about testing before you develop new methods;
doing so can help you figure out how to implement them. To test the method,
we can invoke it from main using sample values:
double dist = distance(1.0, 2.0, 4.0, 6.0);
With these values, the horizontal distance is 3.0 and the vertical distance is
4.0. So the result should be 5.0, the hypotenuse of a 3-4-5 triangle. When you
are testing a method, it is helpful to know the right answer.
Once we have compiled the stub, we can start adding lines of code one at a
time. After each incremental change, we recompile and run the program. If
there is an error at any point, we have a good idea where to look: the last line
we added.
The next step is to find the differences x2 − x1 and y2 − y1. We store those
values in temporary variables named dx and dy.
public static double distance(double x1, double y1, double x2, double y2) {
double dx = x2 - x1;
double dy = y2 - y1;
System.out.println("dx is " + dx);
System.out.println("dy is " + dy);
return 0.0;
}
The print statements allows us to check the intermediate values before proceeding.
They should be 3.0 and 4.0. We will remove the print statements
when the method is finished. Code like that is called scaffolding, because it
is helpful for building the program, but it is not part of the final product.
The next step is to square dx and dy. We could use the Math.pow method,
but it is simpler to multiply each term by itself.
public static double distance(double x1, double y1, double x2, double y2) {
double dx = x2 - x1;
double dy = y2 - y1;
double dsquared = dx * dx + dy * dy;
System.out.println("dsquared is " + dsquared);
return 0.0;
}
Again, you should compile and run the program at this stage and check the
intermediate value, which should be 25.0. Finally, we can use Math.sqrt to
compute and return the result.
public static double distance(double x1, double y1, double x2, double y2) {
double dx = x2 - x1;
double dy = y2 - y1;
double dsquared = dx * dx + dy * dy;
double result = Math.sqrt(dsquared);
return result;
}
As you gain more experience programming, you might write and debug more
than one line at a time. Nevertheless, incremental development can save you
a lot of time.
Once you define a new method, you can use it as part of an expression, or
build new methods using existing methods.
For example, suppose someone
gave you two points, the center of the circle and a point on the perimeter,
and asked for the area of the circle. Let's say the center point is stored in the
variables xc and yc, and the perimeter point is in xp and yp.
The first step is to find the radius of the circle, which is the distance between
the two points. Fortunately, we have just written a method that does just that (distance).
double radius = distance(xc, yc, xp, yp);
The second step is to find the area of a circle with that radius. We have a written a method
for that computation too (calculateArea).
double area = calculateArea(radius);
return area;
Putting everything together in a new method, we get:
public static double circleArea(double xc, double yc, double xp, double yp) {
double radius = distance(xc, yc, xp, yp);
double area = calculateArea(radius);
return area;
}
The temporary variables radius and area are useful for development and
debugging, but once the program is working we can make it more concise by
composing the method calls:
public static double circleArea(double xc, double yc, double xp, double yp) {
return calculateArea(distance(xc, yc, xp, yp));
}
This example demonstrates a process called functional decomposition; that
is, breaking a complex computation into simple methods, testing the methods
in isolation, and then composing the methods to perform the computation.
This process reduces debugging time and yields code that is more likely to be
correct and easier to maintain.
You might have noticed that circleArea and calculateArea perform similar
functions. They both find the area of a circle, but they take different parameters.
For calculateArea, we have to provide the radius; for circleArea we
provide two points.
If two methods do the same thing, it is natural to give them the same name.
Having more than one method with the same name is called overloading,
and it is legal in Java as long as each version takes different parameters. So
we could rename circleArea to calculateArea:
public static double calculateArea(double xc, double yc, double xp, double yp) {
return calculateArea(distance(xc, yc, xp, yp));
}
Note that this new calculateArea method is not recursive. When you invoke
an overloaded method, Java knows which version you want by looking at the
arguments that you provide. If you write:
double x = calculateArea(3.0);
Java looks for a method named calculateArea that takes one double as an
argument, and so it uses the first version, which interprets the argument as a
radius. If you write:
double y = calculateArea(1.0, 2.0, 4.0, 6.0);
Java uses the second version of calculateArea, which interprets the arguments as two points.
In this example, the second version actually invokes the first version.
Many Java methods are overloaded, meaning that there are different versions
that accept different numbers or types of parameters. For example, there are
versions of print and println that accept a single parameter of any data
type. In the Math class, there is a version of abs that works on doubles, and
there is also a version for ints.
Although overloading is a useful feature, it should be used with caution. You
might get yourself nicely confused if you are trying to debug one version of a
method while accidentally invoking a different one.
Methods can return boolean values, just like any other type, which is
often
convenient for hiding tests inside methods.
For example:
public static boolean isSingleDigit(int x) {
if (x > -10 && x < 10) {
return true;
} else {
return false;
}
}
The name of this method is isSingleDigit(). It is common to give boolean
methods names that sound like yes/no questions. Since the return type is
boolean ,
the return statement has to provide a boolean expression.
The code itself is straightforward, although it is longer than it needs to be.
Remember that the expression x > -10 && x < 10 has type boolean,
so there
is nothing wrong with returning it directly (without the if statement):
public static boolean isSingleDigit(int x) {
return x > -10 && x < 10;
}
In main, you can invoke the method in the usual ways:
System.out.println(isSingleDigit(2));
boolean bigFlag = !isSingleDigit(17);
The first line displays true because 2 is a single-digit number. The
second
line sets bigFlag to true, because 17 is not a single-digit number.
Conditional statements often invoke boolean methods and use the result
as
the condition:
if (isSingleDigit(z)) {
System.out.println("z is small");
} else {
System.out.println("z is big");
}
Examples like this one almost read like English: "If is single digit z, print ...
else print ...".